Therapy Options Explained
The collaborative relationship between therapist and patient is one of the most important elements of successful physical therapy. And patient compliance is an issue will all kinds of medical treatment. Here are four reasons why you need to do your Physical Therapy Homework and why it can be essential for ensuring you are successful in your treatment goals.
You Are an Active Participant in Your Own Rehabilitation
Due to the collaborative nature of Physical Therapy it is important that you and your therapist work together to set goals and come up with a series of exercises that feel comfortable for you to perform and that fit within your schedule. Because of this it is important that you set realistic goals and be honest about how much time you think you can spend doing regular exercises.
Repetition Equals Results
Most of these exercises are meant to be simple enough to be performed by most patients and to be completed in a limited amount of time in your own home and the results of these exercises comes from performing them over and over again.
Exercises Indicate the Progress of Treatment
Doing your Physical Therapy homework will indicate to your therapist how well your treatment is progressing, and lack of practice can result in recurrence of some symptoms and a prolonging of the treatment.
Cessation of Pain Does Not Equal Completion of Therapy
Sometimes the pain caused by injuries requiring physical therapy can cease before you have completed the therapy program itself. However, it is a mistake to assume that just because the pain has gone that you have completed your therapy and met your goals. Thus, it is important to continue with your homework exercises and continue seeing your therapist to ensure that you meet those goals you and your therapist have set before ceasing treatment.
Remember that in Physical Therapy, your homework is your prescription. It is the medicine that your therapist has given you to help you with your difficulties and neglecting the homework won’t give you the results that you want and need.
Newleaf Wellness offers a variety of therapies including physiotherapy, chiropractic, naturopathic, and massage therapy in a warm and compassionate environment in our Abbotsford location. If you have any questions about this article or would like to make an appointment, please contact us.

Healthy Habits & Lifestyle
Spring is here—the sun is shining, birds are chirping, and gardens are calling. But before you dive into planting and pruning, it’s important to know how to prevent lower back pain while gardening. Long hours in the yard can lead to soreness, spasms, and strain—especially in your lower back. The good news? A few simple habits can make all the difference.
🏃♀️ Warm Up Before You Dig In
Start with light movement to prepare your body. A brisk walk around the block or a few minutes of marching or jumping jacks will get your blood flowing and loosen up your muscles.
🧘♂️ Use Proper Body Mechanics
- Bend with your knees, not your back. This reduces strain and protects your spine.
- Engage your core muscles while lifting or reaching. A stable core supports your lower back.
- Keep objects close to your body when lifting to avoid overextension.
- Squat or kneel instead of bending over. Use knee pads to stay comfortable during longer tasks.
🔄 Avoid Twisting and Overreaching
Sudden twisting motions can lead to injury. Instead, use your body weight to push or pull in a straight line. Move your feet to reposition rather than twisting your torso.
⏳ Pace Yourself and Take Breaks
Don’t try to tackle the entire garden in one go. Break your tasks into smaller sections and rest between sessions. Sit down, stretch, or take a short walk to reset your body.
🌼 Gardening Shouldn’t Hurt
You don’t have to accept pain as part of the process. With these tips, you can enjoy your garden and protect your back at the same time. If discomfort persists, consider booking a massage to release tension and restore mobility.
Book your wellness appointment today.
Mental Health and Emotional Wellness
What is self-compassion?
Self-compassion is having the same compassion towards yourself that you have towards others. Compassion for others is when you notice that someone is suffering and you are moved by their experience. Your heart feels for the suffering that they are going through. Compassion for others is not pity; it is about recognizing that everyone is human and imperfect. In a way you are identifying with the person you see struggling. Self-compassion is about taking this feeling and turning it inward towards ourselves.
Seems easy right? Unfortunately, given today’s society this has become a difficult skill. One only has to turn on any social media platform and see that we do not live in a world that is accepting of imperfection. From body image, to planning a birthday, to relationships and sex, to being an involved parent we are constantly reminded of what the expectation is and how we fail to meet this expectation every day.

Why is self-compassion important?
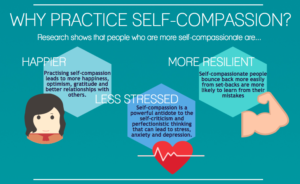
When we are lacking in self-compassion we tend to start talking to ourselves negatively. We realize that we can not meet the expectations that we, or others, have set and we berate ourselves for not doing a better job. Negative self-talk induces the stress hormone (cortisol) in our body. As we know having high levels of cortisol impacts our physical and mental well-being. Research shows that people who practice self-compassion are happier, less stressed, and more resilient.
So you may be asking yourself: “Why do I keep talking to myself this way if it’s not good for me?” There are many reasons an individual engages in negative self-talk, the most common one being for motivation. We think that we will be more motivated if we tell ourselves we aren’t doing a good job. The reality is that negative self-talk has the opposite effect. Other reasons may be that we don’t feel we deserve to be kind to ourselves, to punish ourselves, or past experiences have impacted our self-talk.
When we can speak kindly to ourselves and are gracious with ourselves we are happier, healthier, and more connected to ourselves and others. Overall we will excel in other areas of our life.
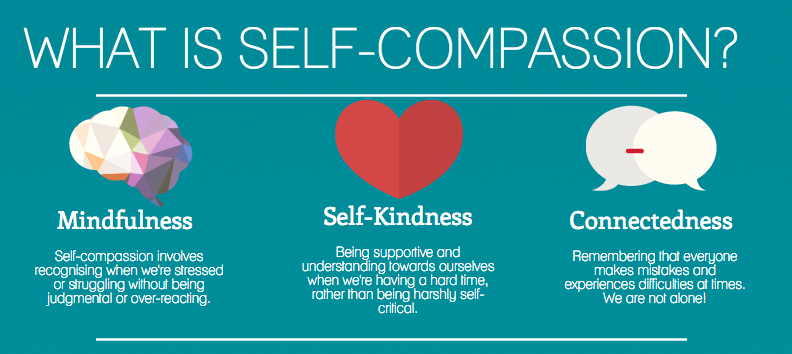
How can I incorporate self-compassion into my life?
There are three main components (or skills) of self-compassion.
- Self-kindness is demonstrating to yourself the kindness that you have towards others when you are struggling.
- Common humanity involves acknowledging that everyone suffers. Suffering is a part of life and as humans we all suffer. It’s recognizing that if you are suffering it is not because there is something wrong with you, but that everyone has moments of suffering. Inadequacies and imperfection is part of the shared human experience.
- Mindfulness is noticing when we are suffering and attending to our struggle. Being mindful is to observe negative thoughts with openness. As Dr Kristen Neff, the pioneer of self-compassion, states “we can not ignore our pain and feel compassion for it at the same time.” Lastly, a key piece of mindfulness is to remain non-judgemental when we notice our suffering and negative thoughts.
Practical Tips:
– Practice the three skills detailed above when you are in a moment of suffering.
– Create a self-compassion mantra that you can say to yourself when you are struggling. It may go like this “may I be kind to myself in this moment, may I give myself the compassion that I need” or “this is a moment of suffering, everyone suffers.”
– When you notice yourself speaking negatively ask yourself if you would speak to a friend like that.
– Reflect on the negative self-talk that you have noticed. This may include if there is a common theme in your self-talk, if it’s related to past experiences, or if you have a tendency to set unrealistic expectations and respond with negative self-talk.
– Engage in relaxation exercises, or guided meditations, that focus on self-compassion. There are a number of videos on youtube that are self-compassion meditations. Dr Kristen Neff records relaxation videos on her website (http://self-compassion.org/).
– Complete self-compassion exercises from Dr Kristen Neff’s website.
– Visit Dr Kristen Neff’s website to read more about self-compassion and how you can include this practice in your life.
My Story with Self-compassion
For most of my life I have been a perfectionist. As I stated above, perfectionism creates unrealistic expectations and then feelings of failure. So, you can imagine that my critical self-talk was fairly intense for most of my life. When I was introduced to the concept of self-compassion my first thought was “obviously I do this – I love myself so I must talk to myself kindly.” Well was I wrong! When I started listening to the thoughts running through my head I realized that I was extremely critical towards myself. At this point my immediate reaction was shame. I went to a place of “if you really love yourself how could you talk to yourself this way?” and “You know better.” I was clearly not using the mindfulness skill of listening with a non-judgemental stance. Thus, began my journey to changing the critical voice in my head into a compassionate voice. This required an immense amount of reflection on why I speak to myself critically. It also required a conscious daily practice to challenge the negative self-talk and change it into compassion.
I can say that now, after time and practice, self-compassion is more natural to me. What I’ve noticed is that I am considerably happier in my every day life. When I am struggling and I use self-compassion I have noticed that my fear, pain, anxiety, or whatever strong emotion I am experiencing immediately decreases in intensity. I then feel that I can manage whatever struggle I am experiencing. I have also noticed that the times that I do not utilize self-compassion in times of struggles that I have a harder time accepting myself and the situation which then increases the intensity of my suffering. Utilizing self-compassion has changed the way that I see myself and the world. I find that I am more accepting of myself, which in turn means that I can connect to my worthiness and self-love. It is wonderful gift you can give yourself when you can be compassionate to yourself and connect to your worthiness. I hope this inspires you to take your own journey to self-compassion.
Kristi Breugem RCC, MSW, RSW

Healthy Habits & Lifestyle
Foam Rolling: Are You Doing It Right?
Everyone’s heard of foam rolling—but how many people are doing it correctly? I won’t claim to be an expert, but even a little research reveals a flood of opinions on how to release those stubborn trigger points. Here’s a list of practical tips to help make your foam rolling more effective.
Roll Slowly for Better Results
Just like stretching, foam rolling works best when done slowly. If you roll too fast, your muscles and tendons activate a protective reflex. This reflex causes them to contract, which prevents the muscle from relaxing.
Pause on Knots to Release Tension
When you hit a knot, pause for 15–20 seconds. Trigger points need time to release. Combine the pause with gentle muscle contractions and a few deep breaths to speed up the process.
Roll Above and Below the Pain Point
Fascia connects everything in the body. Rolling above and below the target area helps release hidden tension. Pain often travels through the fascial web, so the spot that hurts might not be the true source. Cover a wider area to ensure full relief.
Avoid Rolling Directly on Injured Areas
Rolling over a bruise or injury can increase inflammation and pain. Instead, use a lighter roll near the injury—closer to the heart or core. This technique helps flush the area and brings in fresh blood to support healing.
Choose the Right Tool for the Job
Different rollers work better for different areas. For example, a standard 3–4 inch foam roller won’t reach deep hip muscles effectively. Try using a tennis or lacrosse ball to target those hard-to-reach spots around the pelvic girdle.
Blog Written by Jason Togeretz RMT

Pain Relief and Physical Health
Here’s your blog formatted for WordPress with SEO best practices, clear subheadings, short paragraphs, and keyword integration. The focus keyword is heat vs ice for pain.
Title: Heat vs Ice: When to Use Each for Pain Relief
Meta Description: Learn when to use heat vs ice for pain relief. Discover which therapy works best for injuries, inflammation, soreness, and muscle tension.
Focus Keyword: heat vs ice for pain
Heat vs Ice for Pain Relief: What to Use and When
Heat and ice are both effective tools for managing pain. But knowing when to use each can be confusing. These simple guidelines will help you choose the right therapy based on your symptoms and injury type.
When to Use Ice
Use ice for acute pain or new injuries that cause swelling or inflammation. Ice helps reduce inflammation and numbs pain. Avoid using ice on chronic injuries, muscle tension, or spasms—it can make those symptoms worse.
For acute injuries, follow the CBAN method:
Apply ice for 5–10 minutes until the area feels numb. Repeat every 30–60 minutes as needed.
When to Use Heat
Use heat for chronic pain or injuries older than 24 hours. Heat relaxes muscles and improves circulation. It increases blood flow, which brings oxygen and nutrients to the tissue and flushes out waste like lactic acid.
Heat therapy helps with:
- Muscle tension and spasms
- Osteoarthritis
- Poor posture
- Latent trigger points
- Adhesions
Apply heat for at least 20 minutes. Use it as needed to relieve stiffness and promote healing.
Combining Heat and Ice
For fresh muscle injuries with severe pain, start with ice for the first few days. Then switch to heat to ease tension and support recovery.
After Massage: What to Use
- If you feel sore or tender after massage, apply ice wrapped in a tea towel to reduce inflammation.
- If you feel stiff, use heat to relax muscles and improve mobility.
Always monitor the skin to avoid irritation. Be extra cautious with sensitive areas like hands and feet.
Final Tip
Before choosing a therapy, consider the type of injury and how long you’ve had it. The right choice between heat vs ice for pain can help your body recover faster and feel better.
Author: Kristin Stewart, RMT

Healthy Habits & Lifestyle
Are you going to sleep feeling good and waking up with neck and /or back pain? I don’t think a week goes by that a client doesn’t ask me advice on sleeping habits and what pillow they should be using.
Rest and sleep are the body’s chance to heal itself from the postural, physical and nervous system stressors from the previous day. I will try and outline some things to consider in regards to sleep posture and pillows so that you can take steps to improve the quality of rest and repair you need to allow yourself to wake up more rested and ready to face another day.
First question that you need to ask, is what kind of sleeper are you?
BACK SLEEPER? If you sleep on you back, a small pillow under the back of your knees will reduce stress on you spine and support the natural curve in you lower back. The pillow for your head should support your head. the natural curve of your neck, and your shoulders.
When sleeping on the back, the height of the pillow should be lower than in the side lying position.

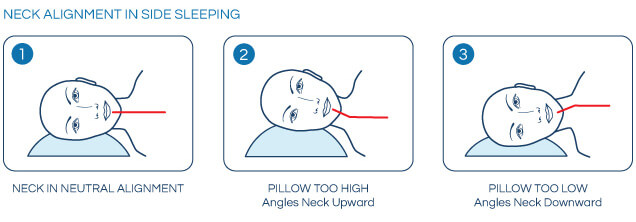
SIDE SLEEPER? If you sleep on your side, a firm pillow between your knees will prevent your upper leg from pulling your spine out of allignment and reduce stress on your hips and lower back. Pull your knees up slightly toward your chest. The pillow for you head should keep your spine straight. A rolled towel or small pillow under your tummy/waist may also help support your spine.
When lying on your side, a pillow should support the head and neck such that the spine maintains a straight and natural horizontal line. Weight should be evenly distributed so as not to create unnatural bending or pressure.

TUMMY SLEEPER? If you sleep on your stomach, it can create stress on the back because the spine can be put out of alignment. You can place a flat pillow under the stomach and pelvis area. This will help to keep the spine in better position or spinal alignment.
When lying on your stomach, a pillow for your head should be flat, or sleep without a pillow. This is to prevent the head and neck to be turned unnaturally to either side.
Important things to keep in mind:
- Insert pillows into gaps between your body and the mattress
- when turning in bed, remember not to twist or bend at the waist but to move your entire body as a unit. Keep your belly pulled in tight, and bend your knees toward your chest when you roll…..Yes I know you are half asleep and can’t control it, but keeping it in mind will slowly let you adapt for it to become second nature!
- Keep your ears, shoulders, and hips aligned when turning as well when sleeping
Summary:
Try and use a variety pillows for both comfort and support – this can make a big difference in alleviating or avoiding back pain and getting a restful sleep.
If you have a spinal disorder, it is so important for you to find the right type of support in order to let your spine rest comfortably.
A firmer pillow can offer better support for those with spinal issues such as disc degeneration, or spinal stenosis. A soft down or feather like pillow doesn’t give much support compared to those filled with firmer materials
Pillows filled with grain or buckwheat hull are often effective as well for people with any of the above conditions.
Not all pillows work well for everyone. A short trial of one week should be enough time to decide whether or not the pillow is right for you and is providing benefit. Pillows should also be replaced at least every 12-18 months otherwise they lose their structure and form.
Happy Sleeping!
Articles Referenced:
Spine-Health.com
The Univesity of Utah “Good sleeping posture helps your Back”